Building and Playing a Marching Machine
Building a Marching Machine
Getting Started
There is no standard size for a Marching Machine so the size of yours can be adjusted to your individual needs. A reasonable size frame is 10 inches by 14 inches and can easily be handled by any age player. The frame can be made from inexpensive 1x2 stock lumber or any reasonably wood stock close in size. All of the materials can be found in any hardware store at inexpensive prices, and many may have these items laying around the garage or basement.
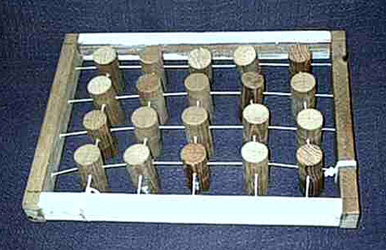
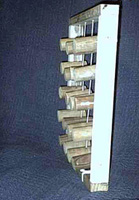
photo courtesy of Leroy Osmon
Materials Needed
This builds a 10 by 14 inch Marching Machine
- 48 inch long pieces of 1x2 stock lumber, cut to the following lengths:
- 2 - 10-inch long pieces of 1x2 stock lumber
- 2 - 14-inch long pieces of 1x2 stock lumber
- 8 (or more) wood screws or nails to secure frame
- Wood glue (if desired)
- 12 feet (Approximately) of heavy string or twine
- 6 foot dowel rod, 1.5 inches in diameter (cut into 20, approximately 3 inch pegs)
Tools Needed
- Saw (to cut 1x2 lumber and dowel rod)
- Screwdriver (or hammer)
- Drill
Assembling the Marching Machine
1. From the 48 inch long 1x2, cut two boards approximately 10 inches long and two boards approximately 14 inches long.
2. Attach the boards together in a rectangle with at least two wood screws (or nails) per joint, and/or wood glue.
3. Drill holes evenly spaced in all four boards with five holes in the 14 inch lengths and four holes in the 10 inch lengths (this is to thread string through). Make sure that the drill bit is large enough for the string or twine to fit through.
4. Cut wooden dowel rod into 20 pieces approximately 3 inches long. Do not worry about making them exactly the same because you will want these “pegs” to hit the surface at different times to create the desired marching sound. (If you are creating a larger marching machine, you will want more pegs. They need to be evenly spaced within the frame (example, 4 rows by 5 rows, or 5 rows by 6 rows, etc., depending upon the size of your frame).
5. Drill holes in the pegs so they can be threaded from both directions. The holes can cross each other or they can be slightly separated. Again, if the pegs are slightly uneven, it produces a more pronounced marching effect.
6. After the frame and pegs have all been drilled, simply start to thread the string from one end of the frame, through the appropriate number of pegs and out the opposite end of the frame (example, if you have 5 pegs per row, thread the string through those 5 pegs only, then come back through the opposite end of the frame; continue until all rows are threaded).
NOTE: you may instead thread one row at a time and tie it off; however, one continuous string provides a more desirable combination of flexibility and tension.
7. After you have threaded from end to end, thread the pegs from side to side. Be sure to pull the string tight so that the pegs are suspended.
Playing the Marching Machine
When playing the Marching Machine, you should experiment with the various ways it can be allowed to “hit” the surface. A rocking or swaying motion produces the best marching sound. It is best to use the Marching Machine on a wood surface (wooden stage floor, wooden table, a piece of solid wood (like plywood) placed over an open container (such as a metal trash can).
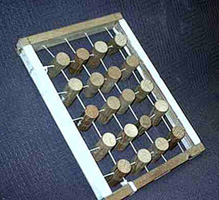
photo courtesy of Leroy Osmon
Who Composes for the Marching Machine?
Various composers have written for the Marching Machine. There are advanced works by composers Morton Gould and Fisher Tull, as well as works for young bands by Leroy Osmon.